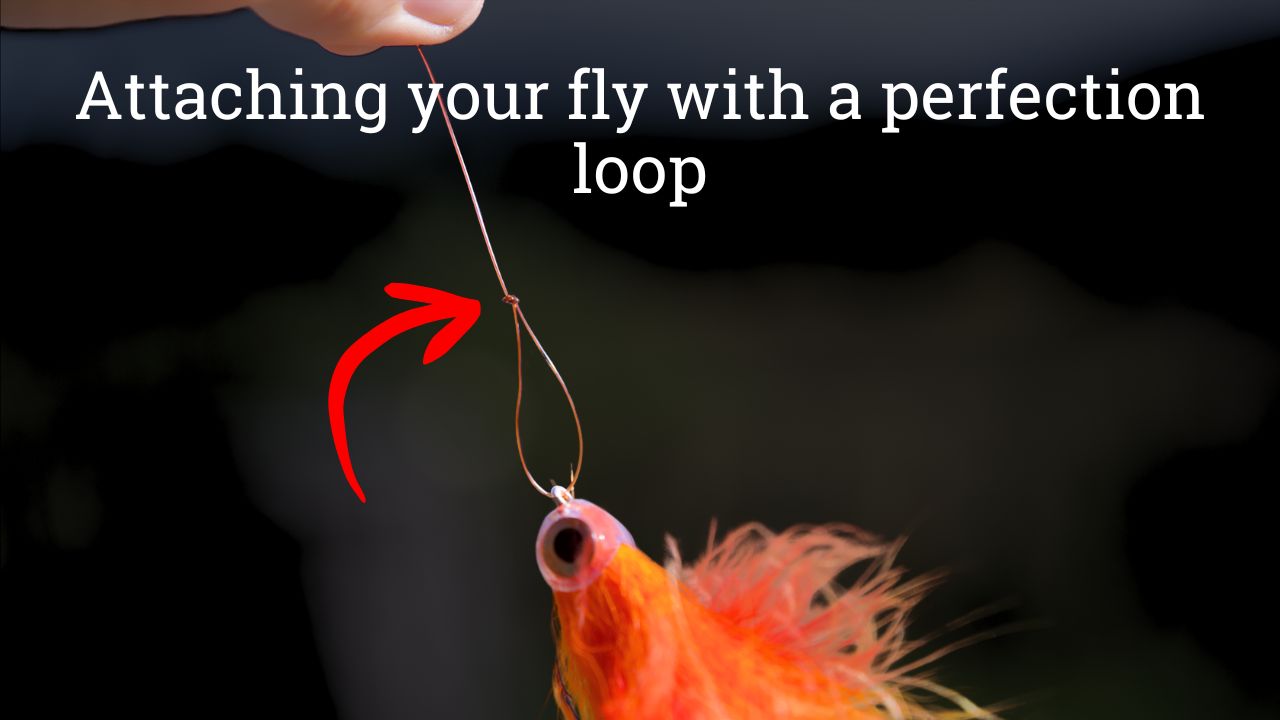
The Perfection Loop is one of the most popular knots in fly fishing. It’s widely used by anglers for loop-to-loop connections of fly lines and leaders, so much so that virtually every factory tapered leader comes with a pre-tied perfection loop in the butt. For whatever reason though, the love for the perfection loop stops there.
Personally, I find it to be way more useful for attaching flies than leaders. It’s low profile, quick, and strong, which makes it perfect as a loop connection for big streamers and heavy tippets. I’ve used it for tarpon, musky, alligator gar, and plenty of other species, and never had it fail even against some of the biggest fish. I’ve used it to tie on my musky flies the past three seasons, on both mono and knowable wire, and you best believe if I ever had a failure there I would stop using it pretty quickly!
Tying a fly on with the perfection loop is basically the same as tying a regular perfection loop, except you have a fly on your second loop that gets pulled through the primary loop when tying. I demonstrate how to use this loop knot in the above video, but I added a step by step guide below as well.
I’m certainly not the best artist, but hopefully this gets the point across. If you need a better guide, this animation from Animated Knots is great— the important difference is just threading the tippet through the eye of the fly after forming the main loop (step 2). Also, remember to make the main loop large enough to fit your fly through!
Step 1
Start out by forming one large loop with the tag coming out behind the main line. Make sure the loop is big enough to fit your fly through.
Step 2
Thread the fly onto the tag of the tippet.
Step 3
Take the tag and form a smaller loop in front of the larger primary loop. Make the loop the size you want it be coming off the fly here, because it's hard to adjust later on. I suggest about the size of the hook gap.
Step 4
I know this one looks a bit confusing, it was confusing to try and draw too. In reality it's not that hard— take the remaining tag and bring it behind the main line again, then up and between the two loops. Hold it in place, and bring the fly and the loop it's attached to through the large primary loop. Pull on the main line to cinch the primary loop down. Once it's relatively tight, grab the fly and pull against the main line to seat the knot. I like to put pliers or something rigid through the loop and pull against that instead of the fly, just to get a bit more force on the knot. When it's well seated, it will never come apart, but if it's a bit loose there is a chance of pull through. When you're done, just cut the tag flush to the knot.
Subscribe now to stay updated with our latest videos, tips, tactics, gear recommendations, and more. Thank you!
No Spam- Ever. Unsubscribe any time
We use cookies to enhance your experience on our site. By continuing to browse, you agree to our use of cookies in accordance with our [Privacy Policy].